Sample Project Field
Alaonix Smart LCD Display Clock Project
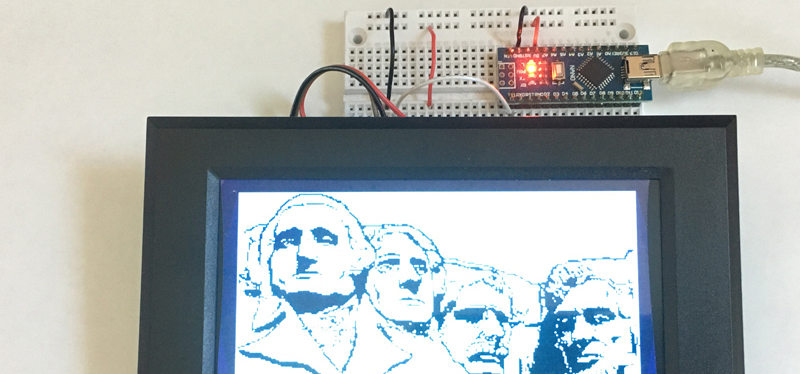
This is Alaonix 256x160 Smart LCD display Digital and Analog Clock test project. It uses The DS1307 serial real-time clock (RTC). The project uses Arduino Nano as controller. The screen show Digital clock Date and time and Analog clock Time. Below is the project detail information.
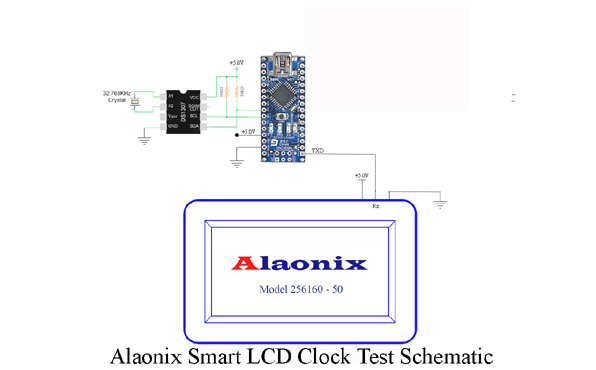
Alaonix Weather Station Schematic:
Analog Clock Test Code-1 for Arduino Nano:
/*==============================================================
File........Alaonix smart 256x160 LCD display module
DS1307 Analog Clock Test code for Arduino
Purpose.....This test code for Alaonix smart 256x160 LCD display module
Board.......Arduino nano
Software....Arduino 1.8.13
MCU.........Arduino ATmage328p
Auther......Alaonix Team
Website.....WWW.Alaonix.com
Email.......AlaTeam@Alaonix.com
Started.....
Updated.....
Note: MINIMUM CONNECTION:
5V <==========> Ala LCD 5V
GND <==========> Ala LCD GND
Arduino Tx <===> Ala LCD Rx
=================== Parameter =============================*/
#include "Wire.h"
#define DS1307_Addr 0x68
byte zero = 0x00;
byte newline[2] = {0x0D,0x0A};
void setup(){
Wire.begin();
Serial.begin(19200);
Set_Date_Time();
//=====================================//
Serial.println("mr"); // Change to root direction
delay(150);
Serial.println("mj,alaimage"); // Change to image direction
delay(150);
Serial.println("ML,0,0,0,1,myclock"); // Load clock scale to buffer 1
delay(200);
}
void loop(){
Display_Date();
delay(1000);
}
void Set_Date_Time(){
byte second = 00; //0-59
byte minute = 59; //0-59
byte hour = 14; //0-23
byte weekDay = 4; //1-7
byte monthDay = 18; //1-31
byte month = 12; //1-12
byte year = 19; //0-99
Wire.beginTransmission(DS1307_Addr);
Wire.write(zero);
Wire.write(Num2Hex(second));
Wire.write(Num2Hex(minute));
Wire.write(Num2Hex(hour));
Wire.write(Num2Hex(weekDay));
Wire.write(Num2Hex(monthDay));
Wire.write(Num2Hex(month));
Wire.write(Num2Hex(year));
Wire.write(zero); //start
Wire.endTransmission();
}
byte Num2Hex(byte val){
return ( (val/10*16) + (val%10) );
}
byte Hex2Num(byte val) {
return ((val/16*10) + (val%16) );
}
void Display_Date(){
// Reset the register pointer
Wire.beginTransmission(DS1307_Addr);
Wire.write(zero);
Wire.endTransmission();
Wire.requestFrom(DS1307_Addr, 7);
int second = Hex2Num(Wire.read());
int minute = Hex2Num(Wire.read());
int hour = Hex2Num(Wire.read());
int weekDay = Hex2Num(Wire.read());
int monthDay = Hex2Num(Wire.read());
int month = Hex2Num(Wire.read());
int year = Hex2Num(Wire.read());
Serial.println("s"); // use Execute batch command
Serial.println("at,1,0"); // copy buffer 1 to buffer 0
//=========== Display second needle =============
Serial.print("Pb,128,80,70,10,1,");
Serial.print(second*6+90);
Serial.println(",0,0");
//=========== Display minute needle =============
Serial.print("Pa,128,80,60,10,4,");
Serial.print(minute*6+90);
Serial.println(",0,0,0");
//=========== Display hour needle =============
Serial.print("PA,128,80,50,10,4,");
Serial.print(hour*30+90 + minute/2);
Serial.println(",0,0,0");
Serial.println("e");
}
Analog Clock Test Code-2 for Arduino Nano:
/*==============================================================
File........Alaonix smart 256x160 LCD display module
DS1307 Analog Clock Test code for Arduino
Purpose.....This test code for Alaonix smart 256x160 LCD display module
Board.......Arduino nano
Software....Arduino 1.8.13
MCU.........Arduino ATmage328p
Auther......Alaonix Team
Website.....WWW.Alaonix.com
Email.......AlaTeam@Alaonix.com
Started.....
Updated.....
Note: MINIMUM CONNECTION:
5V <==========> Ala LCD 5V
GND <==========> Ala LCD GND
Arduino Tx <===> Ala LCD Rx
=================== Parameter =============================*/
#include "Wire.h"
#define DS1307_Addr 0x68
byte zero = 0x00;
byte newline[2] = {0x0D,0x0A};
void setup(){
Wire.begin();
Serial.begin(19200);
Set_Date_Time();
//=====================================//
Serial.println("mr"); // Change to root direction
delay(150);
Serial.println("mj,alaimage"); // Change to image direction
delay(150);
Serial.println("ML,0,0,0,1,myclock"); // Load clock scale to buffer 1
delay(200);
}
void loop(){
Display_Date();
delay(1000);
}
void Set_Date_Time(){
byte second = 00; //0-59
byte minute = 45; //0-59
byte hour = 16; //0-23
byte weekDay = 4; //1-7
byte monthDay = 18; //1-31
byte month = 12; //1-12
byte year = 19; //0-99
Wire.beginTransmission(DS1307_Addr);
Wire.write(zero);
Wire.write(Num2Hex(second));
Wire.write(Num2Hex(minute));
Wire.write(Num2Hex(hour));
Wire.write(Num2Hex(weekDay));
Wire.write(Num2Hex(monthDay));
Wire.write(Num2Hex(month));
Wire.write(Num2Hex(year));
Wire.write(zero); //start
Wire.endTransmission();
}
byte Num2Hex(byte val){
return ( (val/10*16) + (val%10) );
}
byte Hex2Num(byte val) {
return ((val/16*10) + (val%16) );
}
void Display_Date(){
// Reset the register pointer
Wire.beginTransmission(DS1307_Addr);
Wire.write(zero);
Wire.endTransmission();
Wire.requestFrom(DS1307_Addr, 7);
int second = Hex2Num(Wire.read());
int minute = Hex2Num(Wire.read());
int hour = Hex2Num(Wire.read());
int weekDay = Hex2Num(Wire.read());
int monthDay = Hex2Num(Wire.read());
int month = Hex2Num(Wire.read());
int year = Hex2Num(Wire.read());
Serial.println("s"); // use Execute batch command
Serial.println("at,1,0"); // copy buffer 1 to buffer 0
//=========== Display second needle =============
Serial.print("Pb,128,80,70,10,1,");
Serial.print(second*6 + 90);
Serial.println(",0,0");
//=========== Display minute needle =============
Serial.print("Pa,128,80,60,10,4,");
Serial.print(minute*6 + 90 + second/20);
Serial.println(",1,0,0");
//=========== Display hour needle =============
Serial.print("PA,128,80,50,10,4,");
Serial.print(hour*30 + 90 + minute/2);
Serial.println(",1,0,0");
Serial.println("e");
}
Analog Clock Test Code-2 for Arduino Nano:
/*==============================================================
File........Alaonix smart 256x160 LCD display module
DS1307 Analog Clock Test code for Arduino
Purpose.....This test code for Alaonix smart 256x160 LCD display module
Board.......Arduino nano
Software....Arduino 1.8.13
MCU.........Arduino ATmage328p
Auther......Alaonix Team
Website.....WWW.Alaonix.com
Email.......AlaTeam@Alaonix.com
Started.....
Updated.....
Note: MINIMUM CONNECTION:
5V <==========> Ala LCD 5V
GND <==========> Ala LCD GND
Arduino Tx <===> Ala LCD Rx
=================== Parameter =============================*/
#include "Wire.h"
#define DS1307_Addr 0x68
byte zero = 0x00;
byte newline[2] = {0x0D,0x0A};
void setup(){
Wire.begin();
Serial.begin(19200);
Set_Date_Time();
//=====================================//
Serial.println("mr"); // Change to root direction
delay(150);
Serial.println("mj,alaimage"); // Change to image direction
delay(150);
Serial.println("ML,0,0,1,1,myclock"); // Load clock scale to buffer 1
delay(200);
}
void loop(){
Display_Date();
delay(1000);
}
void Set_Date_Time(){
byte second = 00; //0-59
byte minute = 29; //0-59
byte hour = 15; //0-23
byte weekDay = 4; //1-7
byte monthDay = 18; //1-31
byte month = 12; //1-12
byte year = 19; //0-99
Wire.beginTransmission(DS1307_Addr);
Wire.write(zero);
Wire.write(Num2Hex(second));
Wire.write(Num2Hex(minute));
Wire.write(Num2Hex(hour));
Wire.write(Num2Hex(weekDay));
Wire.write(Num2Hex(monthDay));
Wire.write(Num2Hex(month));
Wire.write(Num2Hex(year));
Wire.write(zero); //start
Wire.endTransmission();
}
byte Num2Hex(byte val){
return ( (val/10*16) + (val%10) );
}
byte Hex2Num(byte val) {
return ((val/16*10) + (val%16) );
}
void Display_Date(){
// Reset the register pointer
Wire.beginTransmission(DS1307_Addr);
Wire.write(zero);
Wire.endTransmission();
Wire.requestFrom(DS1307_Addr, 7);
int second = Hex2Num(Wire.read());
int minute = Hex2Num(Wire.read());
int hour = Hex2Num(Wire.read());
int weekDay = Hex2Num(Wire.read());
int monthDay = Hex2Num(Wire.read());
int month = Hex2Num(Wire.read());
int year = Hex2Num(Wire.read());
Serial.println("s"); // use Execute batch command
Serial.println("at,1,0"); // copy buffer 1 to buffer 0
//=========== Display second needle =============
Serial.print("Pb,128,80,70,10,1,");
Serial.print(second*6+90);
Serial.println(",1,0");
//=========== Display minute needle =============
Serial.print("Pa,128,80,60,10,4,");
Serial.print(minute*6+90 + second/20);
Serial.println(",1,1,0");
//=========== Display hour needle =============
Serial.print("PA,128,80,50,10,4,");
Serial.print(hour*30+90 + minute/2);
Serial.println(",1,1,0");
Serial.println("e");
}